Hey there, I’m Simon, and in this Wealthy Affiliate tutorial I’m going to walk you through how you can use Wealthy Affiliate to create a profitable online business.
Wealthy Affiliate is hands down the easiest and fastest way to get your affiliate marketing business up and running, even if you’re a complete beginner and you’ve never done anything like this before.
But here’s the thing:
Wealthy Affiliate keeps adding powerful AI tools and cutting-edge features to supercharge your success.
This makes the process more streamlined and helps you see results faster. However, it can be a bit overwhelming at first. That’s why I’m here to guide you through every step.
From setting up your account to launching your first website, getting traffic, finding affiliate products to promote and scaling up, I’ll walk you through it all in detail.
By the end of this Wealthy Affiliate tutorial, you’ll know exactly what you need to do to create a thriving online business that generates consistent income for you and gives you the time and location freedom you’ve always wanted.
So, don’t just watch – actually follow along with me as we go through this together because that’s the best way to get the most out of Wealthy Affiliate and give yourself the strongest start possible.
Wealthy Affiliate Tutorial: Step By Step
Step 1: Create Your Wealthy Affiliate Account
Step 2: Set Up Your Hub
Step 3: Customise Your Site
Step 4: Find Affiliate Products
Step 5: Plan Your Content Strategy
Step 6: Create & Publish Content
Follow along with this video and I’ll walk you through it:
1. Create Your Wealthy Affiliate Account
Alright, so to get started with Wealthy Affiliate, we first need to create our account.
If you don’t already have a Wealthy Affiliate account, use this link to sign up.
Just click the first link in the description to claim your free Starter membership and this will take you to this page:
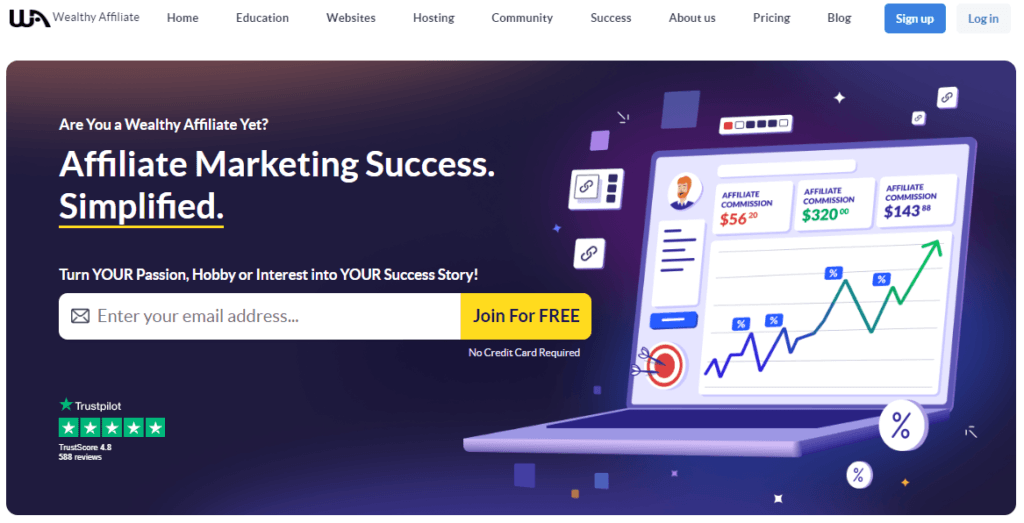
Once we’re here, we can enter our email and click ‘Join For Free’.
Then, on the registration page, we need to set up your account by choosing a username and password or we can just sign up using our Google account.
Once you’ve done that, click ‘Create Your Account’.
Now our Wealthy Affiliate account will be created, and the first thing I like to do is choose a membership plan because choosing a plan within the first 7 days will allow us to get 2 free .com domains and 10,000 bonus AI word credits.
So we can either click the ‘Upgrade Today’ button here at the top or the ‘Upgrade and GO LIVE’ button down here.
As you can see, there are three membership plans with monthly or yearly payment options:
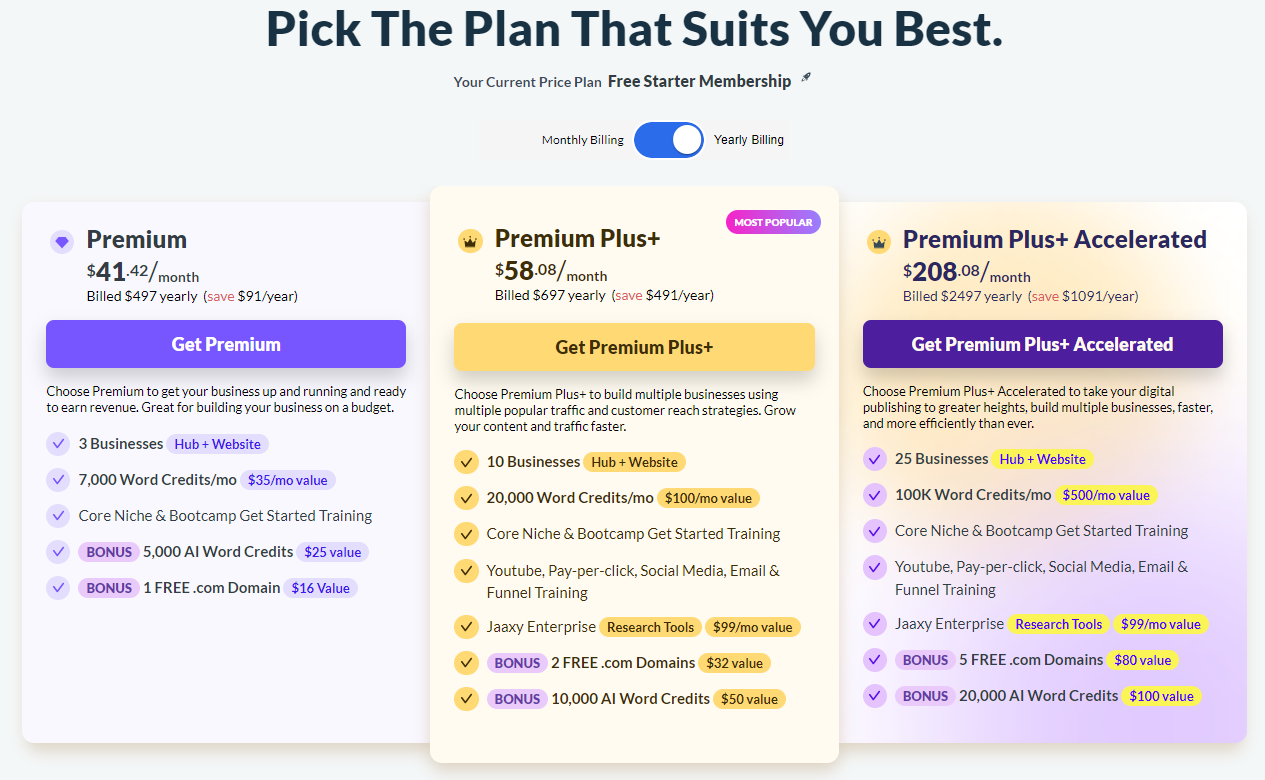
If you’re a beginner, I recommend starting with either the Premium or Premium Plus+ plans. The Premium Plus+ Accelerated plan is more suited for advanced users.
So the one we’re going to choose is the Premium Plus+ plan. It has all the features you need to build out a 6-figure income online.
And while it costs slightly more than the Premium plan, I believe it’s well worth the investment for the additional features and support you get in return.
So let’s click on ‘Get Premium Plus+’ and here we can see an overview of our Premium Plus+ plan. So we can either pay $99 a month or go yearly at $697 for the full year which would save us $491.
And there’s no minimum subscription, meaning we can cancel at anytime for any reason.
So to continue, we want to enter our payment details on the right using either our credit card details or PayPal, and once that’s entered we want to hit ‘Complete Purchase’ and you’re done.
2. Set Up Your Hub
Now it’s time to create our Wealthy Affiliate Hub and launch our website.
Go to Hubs in the top right menu and click ‘Create New Hub’.
First, enter your earnings goal:
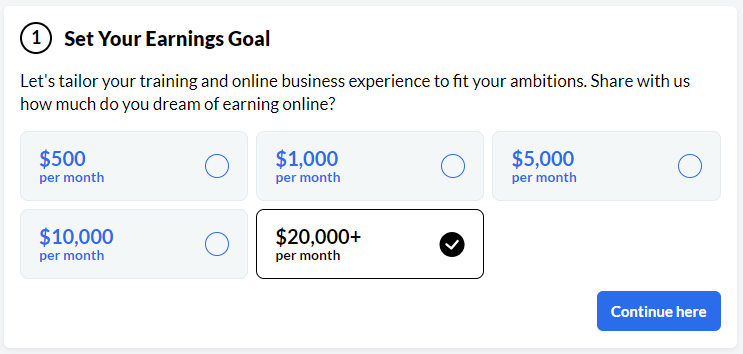
This step is crucial because understanding exactly what your goal is will help you keep you focused motivated and focused on your journey to building a successful online business.
Now we need to choose a direction for your business.
There are two options:

I personally recommend choosing your own niche, especially if this is your first time creating an online business.
Then, later on, when you have more experience and success under your belt, if you want to go down the promoting Wealthy Affiliate route, then you can, but of course, this is completely up to you.
So now, we need to choose a niche.
A niche is simply a topic we’re going to be building your website around and it can be anything at all that you are interested in or have experience in.
Use Wealthy Affiliate’s niche finder tool to come up with hundreds of ideas you can run with:

And you can always come back and change this later if you want to.
So once you’ve chosen your niche, click ‘Continue here’ and now we’re going to choose a brand name for your business which will also be the name of your website:
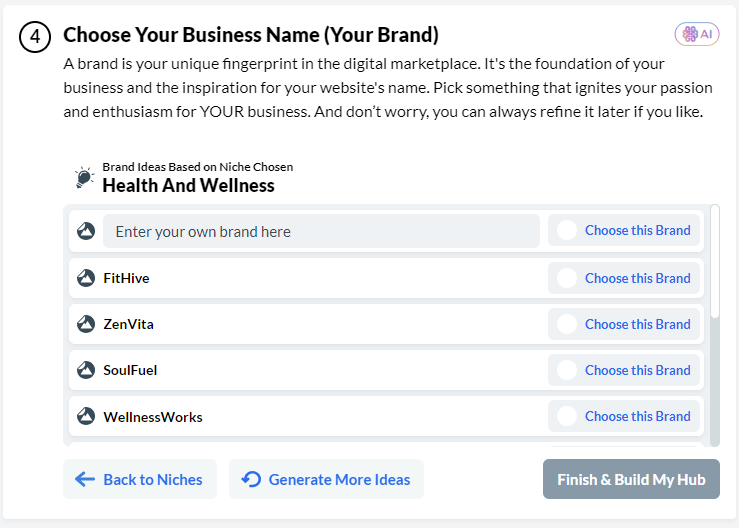
You can either enter your own brand name idea here or use Wealthy Affiliate’s AI to generate suggestions.
Browse through the options, and if none of them stand out, click ‘Generate More Ideas’ until you find a brand name you like and select ‘Choose this Brand’.
Next we’re going to actually register a domain and launch your website.
So what we need to do here is click ‘New Domain’ and type in your brand name to see if the domain is available. And ideally we’re looking for a .com domain.
Once you’ve confirmed your domain is available, select ‘Add to Cart’ and ‘View Cart’. Normally you’d pay $15.99/year but because we’ve upgraded within 7 days, we’re not going to have to pay that, so let me show you how to claim your free domain.
Also, every domain includes:
- Privacy
- Hosting
- Backups
- Support
We’re going to select one year to start off with, enter our best email address, choose a payment method.
We’re going to select ‘Credits’, enter our country, accept terms of service and hit ‘Complete Payment and Register my Domain’
Then Wealthy Affiliate’s AI will do all the heavy lifting and create your Hub and launch your website with WordPress automatrically installed with the brand and in the niche you’ve chosen for you.
So this is what your Hub looks like:
From here you can go through the step-by-step training lessons and track your progress, so I highly recommend you go through that.
You can also log into your website back office, which is what we’ll be doing next.
3. Customise Your Site
To log into your website, click this ‘Log into Back Office’ button at the top of your Hub and that will take you to your WordPress dashboard.
From here we can customise your site, choose a theme, add our logo, create our About page, add blog posts, install plugins, respond to comments – basically this is the control centre of your website.
If you’re new to WordPress, it can take a little while to get used to it but it will become second nature before you know it.
So as you can see, we’re starting our website with a blank slate.
The first thing we’re going to do here is go to ‘Appearance’ in the left-hand side menu and select ‘Themes’.
Your site theme acts like a template that determines your site layout and appearance.
We can see here that the GeneratePress theme comes installed automatically and this is the theme I use for all my sites just because it’s easy to use and comes with a ton of customise options giving you full creative control.
If you would like to change you theme you can go ahead and click the ‘Add New theme’ button at the top and choose from any of these 6,353 free WordPress themes.
Once you’ve chosen a theme, we’re going to go ahead and click ‘Customise’ and select ‘Site Identity’.
We’re going to go ahead and enter our site name and tagline, logo and site icon.
Another thing I like to do is remove the sidebar. This is personal preference but I just like to keep the content on my website the main thing so I’m going to go through these and select ‘Content (no sidebars)’.
If you like, you also go through the colour and typrography sections to add your site’s theme colour and customise your fonts and font sizes.
Once you’re happy with the changes, go ahead and hit ‘Publish’ and they’re now live on your site.
4. Find Affiliate Products
Now we’ve got our website up and running, it’s time to find affiliate products to promote on your website to earn affiliate commissions.
So to do that, we’re going to head back to Wealthy Affiliate and click ‘Promote’ in the top menu which will take us to the Wealthy Affiliate Affiliate Program Search.
Here we enter our niche or topic and hit the search button. That’s going to bring up lots of relevant affiliate programs you can join for free.
We can click on any of these affiliate programs to see what the commission rates and typical conversion rates, cookie length and payout details.
You can also read affiliate program reviews from fellow members and save your affiliate links for easy reference.
Once we’ve found an affiliate program that’s a good fit for our site, we’re going to click the ‘Join this Program’ button and apply to join from there.
And there is no limit on how many affiliate programs you can join or how many income streams you can build out over time.
Once approved, the affiliate program will send you all your unique affiliate links and give you access to your affiliate dashboard so you can track your stats.
5. Plan Your Content Strategy
OK, so now we’ve chosen our topic, launched our website and have our affiliate links ready, it’s time to plan out our content strategy.
Because it’s through content that we’re going to get our website ranked, get visitors coming to the site, clicking your links and geenrating affiliate revenue for you.
And if you want a more in-depth runthrough of how you make money with Wealthy Affiliate then definitely check out this video.
For now, let’s go back to our Hub. Scroll down and you’ll see dozens and dozens of AI-generated content ideas tailor-made specifically for your website and niche.
Let’s head to the ‘Content Ideas and Strategies’ section and click on ‘Blog Topics & Ideas’.
What we’re looking for here are keyword ideas (questions and phrases people type into search engines like Google) that have a high number of searches every month.
To find out what the average monthly search volume is, click the Jaaxy symbol next to any of the suggestions and that’ll open up the Jaaxy keyword tool.
The important things to look at here is Avg (Average monthly search volume) and SEO (overall difficulty score).
The higher the Avg score and SEO score, the better.
Once we’ve found a keyword or content idea to run with, we can add it to our Writing tasks within the Hub simply by clicking the plus icon.
That will now show under the ‘My Writing Tasks’ section:
If I were you, I’d go through this process a few times until you have around 5 to 10 ideas for your upcoming blog posts so you’re never stuck with what to write about.
6. Create & Publish Content
And once we’re ready to actually create our content we’re going to choose one of the ideas from our writing task list and click ‘Write Article’.
The good news is creating has never been easier, thanks to Wealthy Affiliate’s new AI-powered Article Designer which looks a little something like this:
Once we’re on this page, the first thing we’re going to do is enter our post title (we can always change this later if we like).
Your title needs to include your keyword phrase in there somewhere but we want to make it something more clickable.
So for example, say our keyword is “best running shoes” we can use that to come up with a title like “10 Best Running Shoes For Kids (Reviewed & Ranked)”.
Next, we want to add any additional content details here in this box. This is where we could enter any stats or specific information we want to be included in the final article, what products should be included and that we want this to be written as a list post.
Then we’re going to move onto Content Length where we choose how many words we want and click ‘Create Article Outline’.
After about 60 seconds, the article designer will come back with a full article outline.
This is where we can edit or remove sections or add our own and click ‘Save Changes’, then ‘Next: Author Settings’ once we’re done.
We can either write the article ourselves or use the AI content creator, so let’s select ‘Create with AI Author’.
As you can see, we have two options we can go with: Professional Copywriter or Conversational Blogger, each with their own distinct styles and tone.
Feel free to check out the writing samples for each and select the one that resonates with you the most, hit ‘Create Article’ and give it a couple of minutes to let the AI do its thing.
Once we’ve got the full article back, we can go through and make any changes, add our affiliate links and click ‘Publish’ once we’re happy to publish the finished article live on our site.
Wealthy Affiliate Tutorial: The Bottom Line
I hope you’ve found this Wealthy Affiliate tutorial helpful and now you have everything you need to become the next big success story.
Comment below if you have any questions at all about getting started with Wealthy Affiliate, or you can get in touch with me directly inside Wealthy Affiliate.
You also now have full access to a 2.9 million-strong community. You can post a question, there’s the Live Chat and you can message fellow members directly as well.
So rest assured, if you’re building an online business for the first time, you’re in great hands.
I’ll see you inside the member’s area.